


Projectile Type and Base Stats

The Primary version of the Vermisplicer fires a single beam that, upon impact with an enemy or body, will chain out to up to 5 other enemies, much like the Amprex. It has inherited the same base Crit/Status split as the Gaze, a very solid 25% each, Fire Rate of 8, Mag Capacity range, and Beam Range, ranging from 16-30 metres. However, it has a higher Base Damage range of 33-41, split between Impact, Puncture, Slash and Toxin, biased towards the latter two.
Role and Competition

Their Base Damage compositions are also worth considering. The Amprex deals pure Electricity, which is useful as a light CC, but also prevents you from using the extremely powerful Viral + Heat combo (although Corrosive + Heat is possible). The Vermisplicer's innate Toxin is much more versatile, being used in the strongest elemental combos currently, and its innate Slash also allows for natural Slash procs, where the Amprex must rely on Hunter Munitions.
All in all, I personally feel that the Vermisplicer is almost totally superior to the Amprex. It is easily capable of comparable or superior damage output, alongside comparable or superior range. Additionally, it has a more versatile and useful Base Damage composition and a superior chaining mechanic. The Amprex's only unassailable advantage is its superior Reload Ratio.
The only other Beam Primary with comparable/superior anti-crowd capabilities is the Ignis Wraith, which is more Status-leaning and has a completely different AoE mechanic.My Build


Vermisplicer Secondary

Projectile Type and Base Stats


The Vermisplicer Secondary is rather different to the other beam Kitguns. It instead fires a spread of beams, like the Primary Phage, except without the ability to converge them together. It is essentially a Beam Shotgun. Like its Primary version, it inherits the excellent 25% base Crit and Status Chances (though of course Status Chance is split among beams) from the Gaze, Fire Rate of 12, and its relatively small Mag Capacities. The Vermisplicer's Base Damage is extremely high, ranging from (14x5)=70 to (18x5)=90. In exchange however, its Beam Range is quite low. It also has innate Punch-Through of 1 metre.
Role and Competitors
The only other Beam Secondary with multiple beams is the Ocucor. The Ocucor spawns additional, auto-targeting beam tendrils after every kill, to a maximum of 4 additional tendrils. This resets on reload. Even with all its extra tendrils active, the Ocucor deals less damage than the weakest Vermisplicer Secondary, and has far worse Crit/Status. However, its tendrils auto-target where the Vermisplicer's tendrils have a set spread range.
As such, though the Vermisplicer's Base Damage is very high, I've personally found its direct damage output to be slightly less impressive. Headshots in particular are frustratingly difficult to land consistently, which puts it at a distinct disadvantage to other, particularly Crit-focused, weapons. Beyond point-blank range, the tendrils typically spread too wide to converge onto a single target.
In terms of on-paper single target damage, a Crit-built Vermisplicer comes out well ahead of any other Beam Secondary, and among the best Secondaries. Its lead is diminished by its inability to concentrate full damage into a single point, though of course this applies to all Shotgun-type weapons.
Status-wise however, the Vermisplicer Secondary falls well behind other Shotgun Secondaries. In the Status update in U27.2, all Shotguns had their Status Chance divided among pellets, then tripled to compensate. The Vermisplicer has no such advantage, reaching a mediocre 7.8% base Status Chance per tentacle with max Status Chance Loaders. This is well below most other Shotgun Secondaries. More Crit-focused builds have barely any Status Chance.
My Build


My Secondary Vermisplicer uses the Lovetap and Slapneedle. This gives it quite high Damage but a maximum Range of about 16 metres - quite short compared most Beam weapons. Ideally, I would have gone with a Killstream/Splat for maximum Crit because of how low the Status Chance is, but I wanted to build a different Loader.
Mod setup are pretty standard, with my Riven replacing Lethal Torrent to keep some semblance of ammo efficiency. Viral/Corrosive + Heat are the usual main combos. With innate 1m Punch-Through, a Vermisplicer Secondary is reasonably effective against tightly grouped enemies, and can get away without using Seeker. It is of course is much less consistent than proper AoE weapons like the Kuva Nukor and explosive weapons.
Again, I am a fan of Pax Charge as it fits my playstyle well. Arcane choice is largely more to personal preference.
Like was mentioned with the Primary above, Grip choice is largely down to Range preference. The Lovetap is only the second-shortest Range, and 16m is already quite short - the Haymaker would be shorter still. Additionally, the Base Damage differences are pretty small, with the weakest Grip Gibber still having Base 70 Damage, where the Haymaker has 90. Loader wise, as mentioned previously I'd strongly recommend leaning fully into Crit. The Vermisplicer Secondary's Status capabilities are not great, and fall well behind any other Shotgun Secondary, and its spread makes it less consistent than more conventional weapons.
Sporelacer Primary

Projectile Type and Base Stats

The Sporelacer Primary fires small, relatively slow explosive rounds with heavy projectile drop. These have a relatively small explosion radius of 2.1 metres, though do have only slight Damage Fall-Off. The Fire Rate, Mag Capacity and Crit/Status (21% base) are all directly inherited from the Catchmoon.
The Sporelacer Primary's direct-impact damage is pure Impact, while its explosions deal pure Toxin. Oddly enough, it also has a degree of Damage Fall-Off from 8-16 metres, though I do not know how extreme. The Sporelacer's Base Damage range is also much more extreme, ranging from 81 to 271.8, where the Catchmoon only ranges from 88 to 172.8.
Role and Competitors

Naturally as an explosive weapon, the Sporelacer is best as an anti-crowd weapon. Oddly enough, the Primary version is classified as a Shotgun. As such, it competes most closely with a Catchmoon Primary as well as the Astilla. As mentioned previously, it shares the Catchmoon's Crit/Status split, with the only stat differences coming down to Damage Fall-Off and Base Damage. A high Damage Sporelacer will deal much higher on-paper damage than a high Damage Catchmoon, as can be seen from the Base Damage ranges. The Catchmoon does have a significantly longer effective range, though its AoE is somewhat less consistent as its projectiles are quite small.
The Astilla is a Status-focused explosive Shotgun, notably dealing a high amount of Slash damage on its explosions. It will beat the Crit/Status spread of any Status-leaning Sporelacer, with slightly larger explosions. Additionally, while the Astilla excels at inflicting Slash procs, the Sporelacer cannot do so without Hunter Munitions, which of course requries a Crit build. A high/max-Mag Capacity Sporelacer does have the advantage in Reload Ratio, and the Tremor will offer it superior Burst DPS as well.
Looking more broadly at other Primaries, the Sporelacer has to compete with very strong weapons like the Acceltra and Trumna. Simply put, it doesn't really. The Acceltra, though it has barely any Status Chance, will easily beat a max-Crit Sporelacer for direct damage, while also having larger explosions for superior anti-crowd firepower. Additionally, Hunter Munitions and a much higher Fire Rate allow it to somewhat make up for its lack of Status Chance.
The Trumna is a little different. Though it will lag behind a high-Crit Sporelacer for Burst DPS, it will have a much better Status Chance and Reload Ratio, as well as an exceptionally powerful Alternate Fire. Conversely, while a Status-focused Sporelacer can compete for Status output, it will fall far behind for direct damage. The Sporelacer cannot be built in a way to match the Trumna's Crit/Status spread. Additionally, the Trumna's base majority Heat damage is very strong on a weapon with such high Status Chance.
I'd consider both the Acceltra and Trumna to be superior to a Sporelacer Primary. The Astilla and Catchmoon Primary are much closer comparisons, and the Sporelacer does carve out advantages against those two.
My Build


My Sporelacer Primary uses the Tremor and Bashrack. Again, the Bashrack was chosen partly so I could build a different Loader to the others. As a result of the insane (and somewhat nonsensical) Base Damage range, I strongly recommend using the Tremor as the Grip. Not only does it deliver by far the highest DPS, but it also preserves your very limited ammo, giving a much higher Reload Ratio than the others as well.
In terms of Crit-Status spread, going for high/max Crit nets you the highest direct damage and decent use of Hunter Munitions, however it is largely outclassed by weapons like the Acceltra and Trumna in this respect. Using Shotgun mods unfortunately makes Crit-built Sporelacer Primaries somewhat less effective. Shotguns have the worst Crit mods of any standard weapon class in the game, with the measly +90% Crit Chance from Blunderbuss being the key weakness. Going for high/max Status gets you a fairly solid Status spreader, however again the Astilla and Trumna are both quite competitive, if not superior, in this respect.
I've slotted in Pax Seeker as on the off chance it triggers (unlikely for such an imprecise weapon), it produces quite powerful projectiles. Though I often like Pax Charge, it is very slow on the Sporelacer (much like it is on the Catchmoon), to the point where regular reloading is largely better.
Sporelacer Secondary

Projectile Type and Base Stats

The Sporelacer Secondary also fires explosive rounds. Much like Primary vs Secondary Catchmoon, the Secondary version is slower firing, but is more powerful and has a much larger explosion. Again, the Sporelacer Secondary copies the Mag Capacity, Fire Rate and Crit/Status Chance split from the Catchmoon. However, its base Crit Multiplier is a massive 3x.
The Sporelacer Secondary's Base Damage ranges from a measly 103 to a massive 664. The Catchmoon only ranges from 160 to 460. Again, the direct impact deals pure Impact, with the explosion dealing pure Toxin. The explosion has a very respectable 4.7 metre radius, with 50% Damage Fall-Off at its edges.
Additionally, on detonation, its projectiles release a number of smaller sub-munitions. I'm not sure what their stats are, or if it applies to the Primary version as well. Unlike the Kuva Bramma, these bomblets seem to only drop directly down, rather than spread out.
Role and Competitors

Given both are AoE weapons with quite similar base stats, the Sporelacer Secondary naturally competes directly with the Catchmoon. Oddly enough, the Sporelacer Secondary's Damage Fall-Off is further than the Catchmoon Secondary's. Both are distinct and extremely potent anti-crowd weapons. The Catchmoon is better against enemies in a line, easier to use at point-blank range, and can land headshots quite reliably. The Sporelacer deals a lot more damage on direct hits, and has a much larger radial AoE.
There are a couple of other explosive Secondaries, though the Sporelacer is larger superior to most of them. Of note, the Zakti Prime is a far better as a Status-focused weapon, though of course will fall far behind for direct damage. The Staticor is capable of both quickly firing smaller explosive rounds, as well as slower, heavier shots. Additionally, it deals pure base Radiation damage. The Sporelacer however can exceed its Crit/Status spread thanks to its extremely high Crit Multiplier, and for the most part is capable of much higher damage output.
Overall, I think the Sporelacer makes a solid case for being the best explosive Secondary currently in the game.
My Build
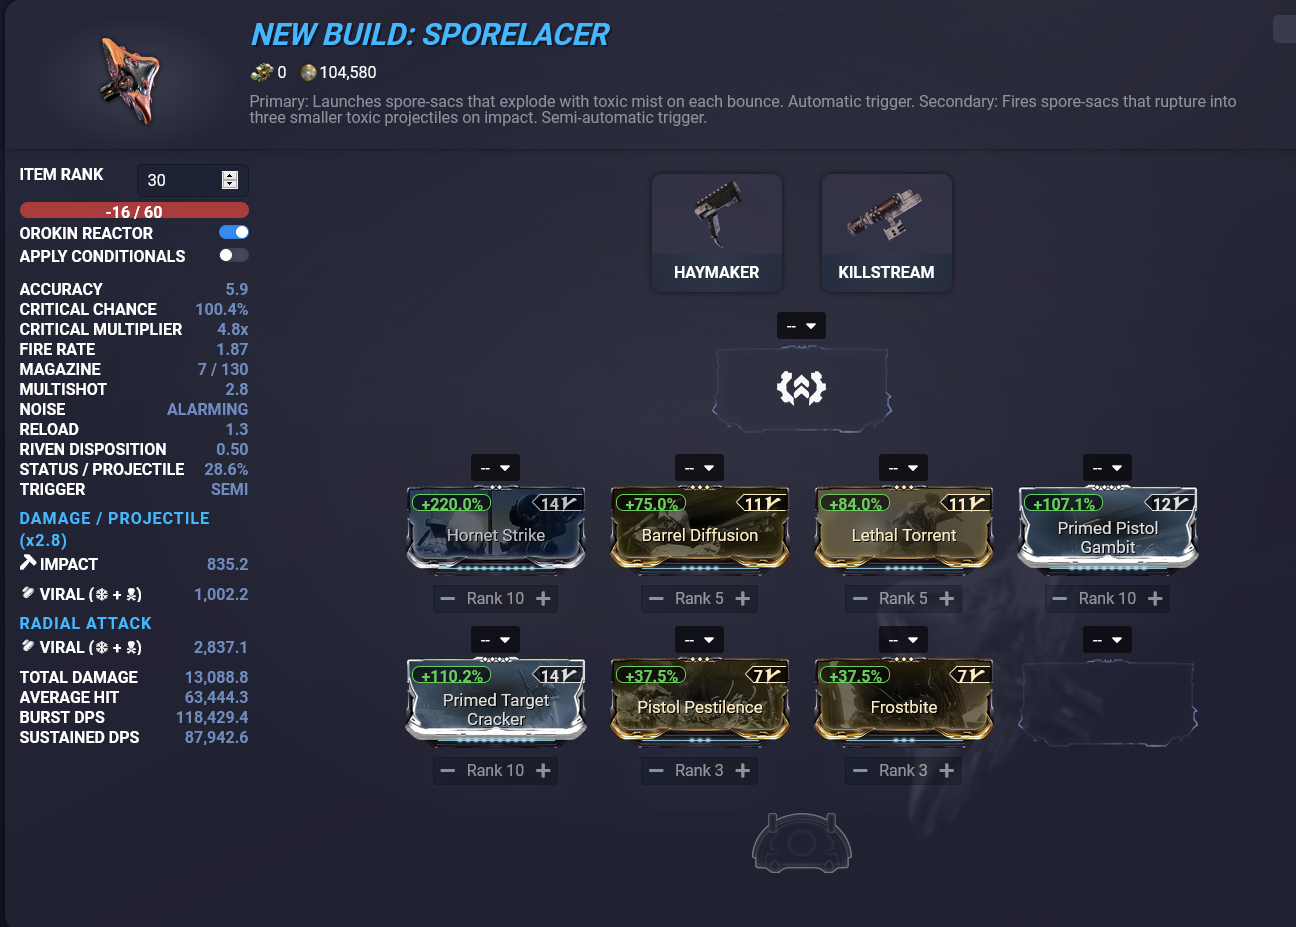


My Sporelacer Secondary uses the Haymaker Grip and Killstream Loader. Grip wise, I'd strongly recommend either Haymaker or Lovetap. Its Mag Capacity is very low so you are best off maximising damage-per-shot, accounting for personal preference in Fire Rate. Though the Haymaker is extremely powerful, it is also extremely slow - though the Lovetap has worse DPS, it fires faster which can be a significant usability advantage. The other Grips have far worse damage-per-shot, making them largely not worth it.
Given its unusually high base Crit Multiplier of 3x, the Sporelacer is pretty much always worth Crit - even a higher Status Chance build has very usable Crit. That said, building for max Crit gives it massive damage-per-shot with excellent radial damage. If you want a little more consistency in inflicting Status procs, the moderate +Crit Loaders still retain respectable Status Chance, while still also dealing a great amount of damage.
I'm a big fan of Pax Charge on the Sporelacer Secondary. It is not proficient at landing headshots, so does not suit the effect-on-headshot-kill Arcanes well. With a +Reload Speed Loader like the Killstream, Pax Charge kicks in just a short time after you stop firing. In practical use, I found that this gave it essentially unlimited Mag Capacity, as I almost never needed to fire all 7 rounds in quick succession.
Conclusion
- Of the four new Kitguns, the Sporelacer Secondary is my favourite. It deals a very large amount of direct damage in a respectable radius, and was generally just a lot of fun to use. It clears out groups of weaker enemies with ease, and can even do fairly well against heavier ones. I'd strongly recommend going for increased/maximum Crit because of its crazy Crit Multiplier, and because I generally dislike slow-friing Status weapons.
- My friends are big fans of the Amprex; they were very pleased with the new Vermisplicer Primary which is an almost total upgrade when built for Crit. Both Crit and Status builds can be made fairly potent.
- The Vermisplicer Secondary, though it has fairly short effective range, is also capable of very high damage output. In particular, it is best with a high/max Crit build for maximum direct damage, as it struggles to do much Status-wise.
- The Sporelacer Primary is relatively underwhelming and faces much stiffer competition than the others. Both Crit and Status builds are not amazing and have strong non-modular alternatives to consider.
No comments:
Post a Comment